Tuesday, May 17, 2011

Intro to Figure Drawing

Click on image to enlarge

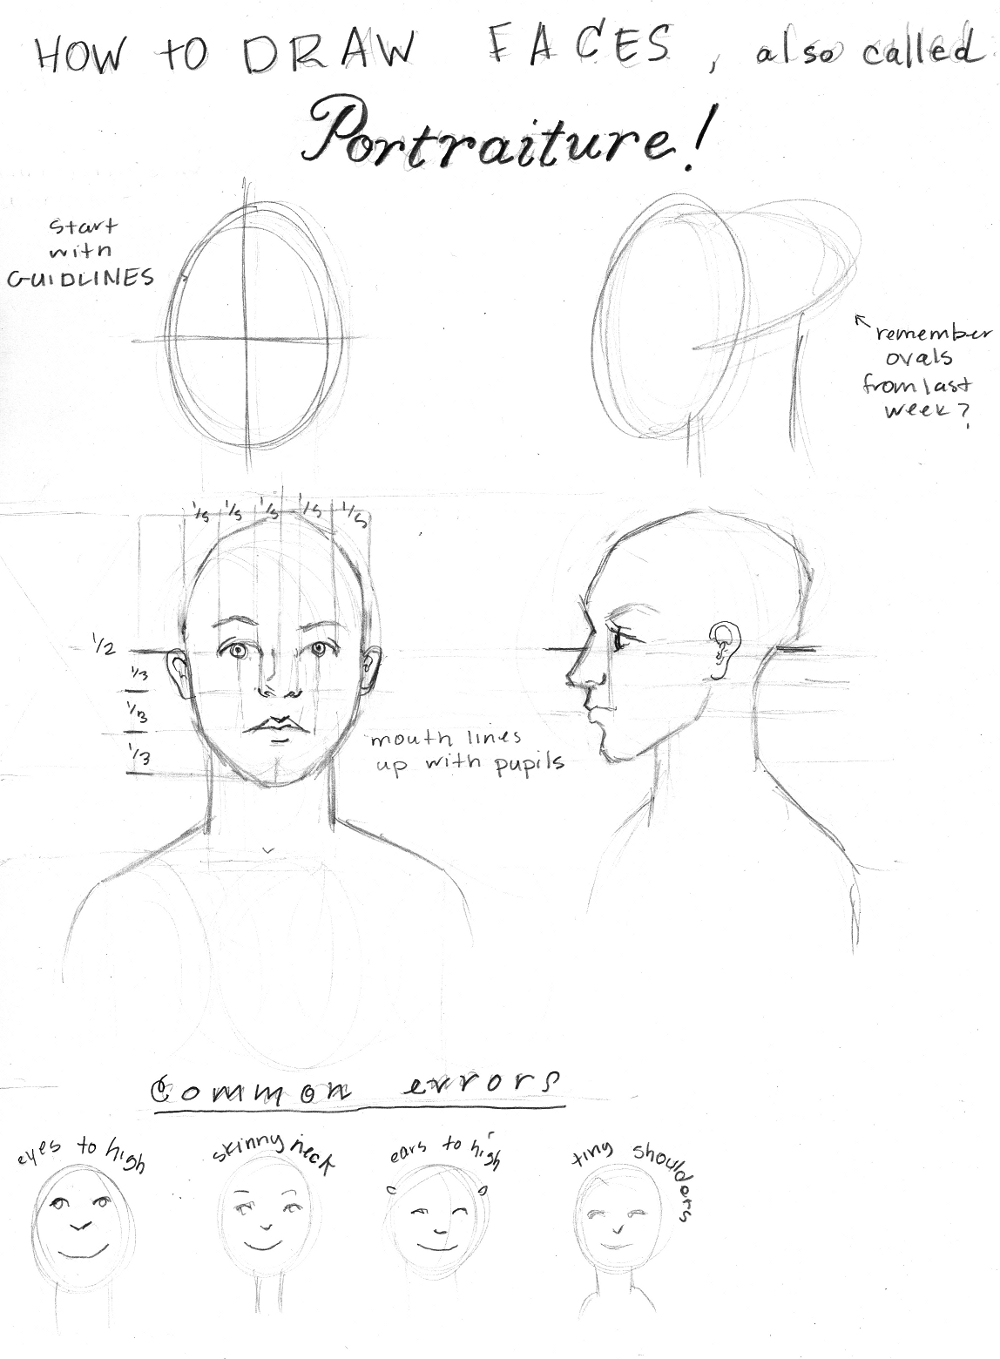
Get your pencils out and start measuring! Once you learn how to measure using a constant, in this case the scull, you can figure out how to draw almost everything. This is the system used to draw Marvel Comic book characters to drawing chibis.

Just remember that the human body is not block like, but curves along in a long S shape. Otherwise the person you draw might look a little stiff, like an Egyptian sculpture, unless that is what you are going for :)

Here is video of some using their pencil to measure a chair. She does not mention, but it is critical to hold out your arm all the way, and make sure your pencil is perfectly up and down (perpendicular to the ground).


Negative Space


A very simple concept, but one that we tend to neglect in the western hemisphere. It is so helpful when something seems like it's not quite right, but you're not sure why.


Space Relations, How to Copy Accurately


1. Make sure the the size of the paper you are using has the same proportions as the image you are replicating. If you have a rectangular piece of paper, and try to copy a square shaped drawing, its going to come out skewed, and will be a very frustrating experience. An easy way to check is the line up your pencil from corner to corner, and make sure that both the image and your paper have the same angle. On the example drawing you can see that I drew a line from corner to corner to make sure that it was the same. This simple guideline is very important!

Sometimes the beginning stages of a drawing look very messy. This is ok. It might look like a mess to anyone who looks at it, but it just has to make sense to you. We can erase all the guidelines and extras later. No one will ever know!

2. As will the Still Life Drawing the first thing to do is block in the biggest shapes.

3. Proceed to shading.


Still Life Drawing, Intro to Hatching


Drawing a still life for the first time can seen daunting, but its just a matter of breaking down the process into small steps.

1. Draw the block in- Take as long as you need to outline all of the biggest shapes in your drawing. This will serve as the foundation so you want to make sure to take the time to do this part the best you can. Don't worry about drawing any details at this point, just draw the basic shapes.

2. Establish light and dark- The still life has a multitude of tones, ranging from pearly gray to midnight black. The longer you stare the more tones will develop before your eyes. This can be a problem in establishing the correct balance of tones overall. Try to resist the temptation of working in one area for a long time because it will make your job much more difficult in the long run. Try squinting your eyes, so that all you can see is what is light and what is dark. That is exactly what you need to figure out at this point.

3. Now that you have figured out what is being hit by light and what is not, you can finally get the point where you add the details, by shading, and erasing until getting the exact tone that you are looking for. Try not to spend to much time in one area, rather, move all over the drawing so that it develops in layers.


Thursday, April 14, 2011

How to draw faces, also called Portaiture

Click to see larger images.


In the drawing below, you can see the proportions from the class worksheet being used in a self-portrait. You can use your fingers to trace out the proportions and guidelines for yourself.

Monday, April 4, 2011

Discover Drawing I


Notice:

There will not be class on April 20, 2010 because of Spring Break. The make-up class will be held on May 31 (added on the week after to what would have been the last class).


Materials:

-11x14 sketch pad,

-medium hard pencil (HB)

-soft pencil (6B)

-white drawing eraser


Optional:

-very soft pencil (9B)

-gum eraser


Blog supplement to the class:

There will be a review of the concepts and information covered in class at www.flowerandsong.blogspot.com, for parents and children to enjoy.